| |
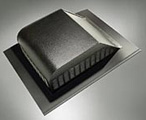
This
is a typical home roof vent. Normally, these are installed without an accompanying
fan.
 Enlarge Enlarge
|
|
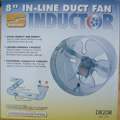
These
duct fans, purchased at a local home supply store, can supply a gentle 500
CFM boost.
 Enlarge Enlarge |
|
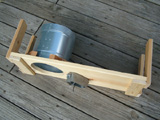
This
is the frame I designed to hold the duct fan up against the roof vent opening.
 Enlarge Enlarge
|
| |
| |
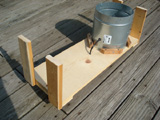
The
frame must be long enough to overlap two rafters. The main frame board is
26" long.
 Enlarge Enlarge
|
|
The
frame must be wide enough to hold the 8" diameter fan pipe. I used
1x10 lumber.
 Enlarge
 |
|
The
arms of the frame must be longer than the 8" high fan pipe. Arms 9"
long seemed work well.
Enlarge
|
| |
| |
I
needed to enlarge the holes in the roof to about 6 1/2" diameter. I
cut a 7" diameter hole in the frame for the air to pass through. Be
sure to line up the holes in the frame to the holes in the roof.
Enlarge |
|
Screw
four small pieces of wood (1x1s) to the frame, positioning them against
the pipe. Screws run through the center of the four pieces and into the
fan pipe to secure the fan to the frame.
 Enlarge
 |
|
Two
nine-inch pieces of 1x3s were glued and screwed to the bottom edges of the
frame to accept the 1 5/8" screws holding the four nine-inch- long
arms. I used scrap 1x4s or 1x3s for the arms.
Enlarge
|
| |
| |
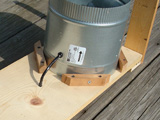
Tape
the 3 exposed fan wires together. Run them through the wood frame and through
the bottom of the outlet box. Connect the green wire to one of the screws
that attach the box to the frame.
Enlarge |
|
Adding plug outlets makes it easy to connect the wires, and provides a handy
work-light plug. To make it easy to work on the fans, I placed a switch
just before the thermostat.
Enlarge |
|
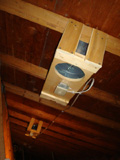
Once
you get the design worked out, constructing the frame is fairly simple.
This picture shows different views of the four frames. The location of the
fan holes varies to match up to the roof holes.
 Enlarge
 |
| |
| |
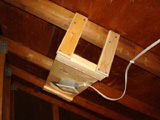
Use
wood clamps to hold the frame arms to the rafters while you screw the arms
to the rafters. Driving the 1 5/8" drywall screws into the pre-drilled
dry rafters was a chore.
 Enlarge
 |
|
Prepare
the required holes in the outlet boxes. After a frame is in place, add the
3-wire 110-volt supply line. A regular attic fan thermostat handles these
four small 1/3- amp fans and the larger, original fan.
 Enlarge
 |
|
Complete
the wiring to one fan, and then run the supply line to the next fan, tacking
it to the rafters. Set the thermostat a little high (110 deg.). Some perspiration
was inevitable. Enjoy!
|
| |